Must-Have Leatherworking Tools for Beginners
It can be overwhelming to be a beginner in leathercraft. It takes years of experience—and lots of money—to faithfully navigate the complex system of leather hides, hardware, supplies, and specialty tools. Seeing social media posts where makers are using $500 pricking irons and $2,000 heat imprint machines doesn’t make it any easier.
When I first started in leathercraft, I used crummy, inexpensive tools, and hesitated to buy “forever” tools because I didn’t know which ones were going to be right for me. Leather tools are expensive, so buying the wrong tool is an expensive mistake. And there are a lot of ways to make a mistake.
Should I use stiching chisels, or pricking irons? French style or diamond? What size teeth? What spacing? Once you pick your chisels, you have to make sure to get the right size thread and needle. Flat braided thread or round twisted? What thickness? And what about skiving? Do you want a Japanese skiving knife, or an American style skiver? Rounded, flat, or oblique? Does “right hand bevel” mean the bevel is on the righthand side? Or does it mean it’s for right-handed people?
Beginner Leathercraft Tool Kits Are Not the Answer
On the other side of the coin, there are the cheap beginner tools and all-in-one leathercraft kits that you find on sites like Amazon and Temu. Cheap tools might seem like a good deal, but the tools are so terrible that they oftentimes make crafting harder than it needs to be. Cheap stitching chisels have teeth that aren’t perfectly straight, causing stitch lines to look sloppy no matter how careful you are. Cheap knives and edge bevelers leave jagged edges that need extra attention just to look halfway decent.
So, where does that leave the fledgling crafter? What should tools should you buy first? This post includes a list of the tools I use almost every day in my shop. These are the tools that you should invest in right from day one to help you improve your skills and grow your craft. It is by no means an exhaustive list, but it’ll help you get started down the right path.
Basic Leather Tools Every Crafter Should Own
Box cutter or utility knife
My utility knife is easily the most important tool in my leathercraft arsenal. I prefer a Milwaukee Fastback (the tactile flip open gets me every time), but there are dozens if not hundreds of options out there, including beautiful vintage models like the Stanley no. 299 pictured below.
Pro Tip: Buy your utility knife blades in 100-packs so you can start with a new blade on every project, and use a strop or sharpening stone to refresh your blade edge as you work. As my grandfather used to say, a sharp knife makes short work.

Self-healing cutting mat
A cutting mat is a must for preserving your tools and protecting your workspace. Vantage makes the best self-healing cutting mats, but you can easily get by with the less expensive Worklion brand or other options. If you’re on a budget you can also use a nylon or acrylic cutting board from the dollar store, or a sheet of soft pine plywood.
Pro Tip: If you get serious about leathercraft, invest in a large sheet of HDPE to cover your entire cutting table.
Ruler, straight edge, T-square
For measuring and cutting straight lines, you’re going to need a good ruler with some non-slip tape on the back. A metal ruler is best in most situations, as your blade is less likely to get stuck in the side as you cut. Avoid rulers with printed hatch marks, as they are less accurate than rulers with engraved hatches. You’ll also need something for making right angles, like a T-square, right angle ruler, or a carpenter’s speed square.
Pro Tip: For pattern-making, I prefer a clear acrylic ruler like the Fiskar’s Sewing Ruler.
Adhesives & contact cement
Fiebing’s leather glue is fine for beginners and novice crafters, but to get the best bond in your leatherwork, invest in some Barge toluene-free cement (in the blue packaging) and learn how to use it properly. If you don’t have a ventilated space, I recommend water based latex contact cement like Reina Aquilim or Intercom Eco-stick, which are both incredible and come highly recommended from yours truly.
Pro Tip: When buying contact cement, choose a “medium bond” adhesive that allows you to reposition your work before tacking it down permanently. Permanent bond adhesives are great for lining or situations where you can’t stitch the two pieces together, but they leave zero margin for error.
Burnishing gum & edge slicker
A wooden edge slicker and a burnishing agent are a must for professional looking edges, especially when working with vegetable tanned leather. You don’t need a fancy edge slicker, the classic wooden cone slicker is cheap and easy to get, and works like a charm. You can also use a piece of canvas cloth, a pencil, a wooden dowel rod, or pretty much anything round and solid.
For a burnishing agent, I use Tokonole or Gum Tragacanth, but you can use water or even saliva in a pinch. Tokonole is the most common burnishing agent these days, it’s fairly inexpensive, and a small jar lasts for months if not years.
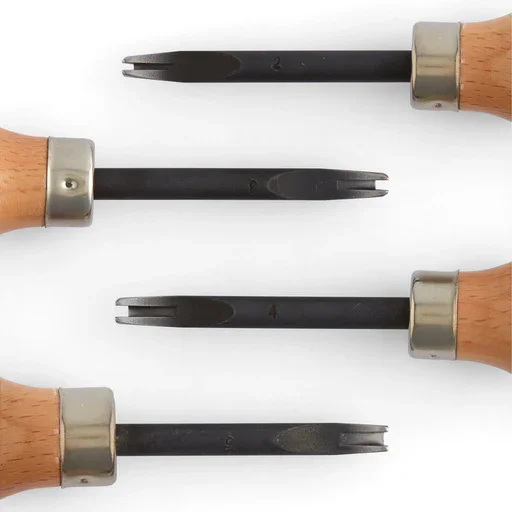
Edge bevelers
Sorry for the plural when I say edge bevelers, but chances are you’ll need more than one size, and you might like to have more than one style of beveler on your bench. I use a combination of Weaver Master Tool edge bevelers and Japanese-style bevelers from Kevin Lee. For light work with wallets and keychains, I use my #2 Japanese beveler the most, and for heavier leathers I use my weaver #0 and #1.
If you’re trying to figure out which beveler to buy, the Tandy Craftool edge beveler is what I started with, and it does just fine for most beginners. For a step up in quality, try the Japanese edge bevelers from Oka Factory, which are terrific. If you want a forever beveler, go for the Weaver Master Tool or the Kevin Lee M390 Steel Edge Beveler.
Wing divider
Wing dividers are used to set stitch lines and measure spacing in your work. You can find wing dividers at most hardware stores, including Harbor Freight. I use my wing divider multiple times per project, so I recommend investing in a stainless steel divider that won’t rust.
John James #004 Saddler’s Needles
Sharp sewing needles don’t work for leather, so invest in a $12 pack of John James Saddler’s needles, which have a blunt tip and will work with most common waxed threads. You can experiment with other sizes depending on the thread you’re using, but I wouldn’t waste time with any other brand besides John James.
Waxed Thread for Hand Stitching
Thread Brands - Ritza, Superior, Maine Thread
When it comes to hand-stitching, there are a lot of thread options out there, but the best place to start is with a waxed polyester thread. I prefer a flat braided thread like Ritza Tiger thread, or a round thread like Vinymo for smaller projects like wallets and jewelry.
Ritza Tiger thread is by far the most popular in the leathercraft community. Are there less expensive waxed threads out there? Sure, but few are as easy to work with as Ritza Tiger. A full-size 500 meter spool will run you over $100, or you can buy shorter 50 meter spools for about $10 each.
For a more budget-friendly option, Superior Waxed Thread from Maker’s Leather Supply is the closest thing you can find to Ritza, at about 1/10th the price. It doesn’t come in as many color varieties as Ritza, but it’s still a damn good thread. Another terrific option for hand-stitching is the Braided Waxed Polycord by Maine Thread which is made in the USA and comes in 3 weights.
Choosing Thread Weights
When choosing the weight of your thread, it really depends on which stitching chisels you’re using. With my 4 mm chisels, I prefer flat waxed thread like Ritza Tiger in .08 mm, or Maine Thread in .030, but with my 3.38 mm chisels, I use a .06 mm Tiger Thread or .020 Maine Thread. Confusing, right? That’s exactly why I’m writing this guide. Thank me later.
Other Styles of Thread
There are so many other options that you can choose when it comes to threads. Waxed, unwaxed. Braided, twisted, bonded. Artificial sinew, real sinew, cotton, linen, blends… the list goes on and on. Each style of thread has its benefits and drawbacks, which are too numerous to list here.
Suffice to say, a lot of leathercraft purists swear by linen thread, but I find it extremely hard to work with (and damn expensive). Cotton thread has a short lifespan and tends to break after a few years of hard use. Polyester lasts forever (literally), doesn’t fade, and is super strong and durable. Plus, with poly threads you don’t have to tie knots, you can just burn the ends and you’re done.

Stitching pony
If you’re gonna stitch, then you need something to hold the work. You can get a basic stitching pony starting at about $30 so it’s not a huge investment. They also make stitching clamps that clip onto your table, standing clamps, and classic saddler’s clams, which you hold between your knees. Choosing a stitching clamp/pony is entirely based on personal preference, but I use a pony in the traditional way (sitting on it).
My most recent stitching pony purchase was the Large Beech Stitching Pony from Kevin Lee, which I love. But I started out with the Leather Stitching/Lacing Pony from Buckleguy, which is also great.
4mm hole punch
If you’re setting rivets and snaps in your work, a 4mm hole punch will likely be the most used punch in your arsenal. However, buying a single punch won’t really get you very far in leathercraft. The best value for beginners is to purchase a set of hole punches or a Rotary Punch.
My first set of punches was the Owden Professional 13-piece Punch Set, which I bought on Amazon. However I refuse to share a link to Amazon on my website so you’ll have to search for it yourself. I also really like this Interchangeable Hole Punch Set from Kevin Lee, or the Deluxe Rotary Punch from Tandy.

Punch pad or chopping block
You’ll use this when punching holes in your work to protect your tools. You can use a thick nylon cutting board if you want, a novolene chopping block from Weaver, or the Grain Flow block from Oka Factory (available on Rocky Mountain Leather). I recommend a small chopping block, because they’re cheaper but also great for punching in tight spaces. I use my small chopping blocks much more than my XL one.
Double Cap Rivets & Rivet Setter
Tandy medium double cap rivets were (and still are) my jam. These have an 8mm or 9mm cap I believe? If you want the best double cap rivets, step it up with solid brass double cap rivets from Buckleguy, which have become my go-to, but they’re quite a bit more expensive than Tandy.
Line 24 snaps & Snap Setter
Again, Tandy is the way to go here. Line 24 snaps are the most common for leathercraft, but you’ll also see a lot of Segma snaps (aka glove snaps), which are easier to open and require a separate setter.
Diamond stitching chisels, 4mm spacing
Diamond chisels are thicker and more robust than French style pricking irons, so you can whack them all the way through the leather without having to finish with an awl, which is better for beginners. The 4mm spacing is a versatile size that can be used for wallets, bags, and larger items.
Rawhide mallet, 11 ounce
Go ahead and get yourself a Garland rawhide mallet. Sure, there are other mallets, including rubber, nylon, and wood types, but rawhide mallets are the industry standard. Rawhide mallets are super durable, and they’ll save your tools from damage (DO NOT use a metal hammer on leather tools!)
Build Your Skills and Hone Your Craft
At the end of the day, leathercraft tools are a lot like leather itself: there’s always something newer, shinier, and more expensive out there. But you don’t need a workshop full of premium gear to start making solid work. A handful of reliable tools, decent thread, and a willingness to practice will take you farther than most beginners realize.
Start simple, figure out what you actually enjoy making, and upgrade your setup over time as your skills improve. Your tools should work for you — not the other way around.